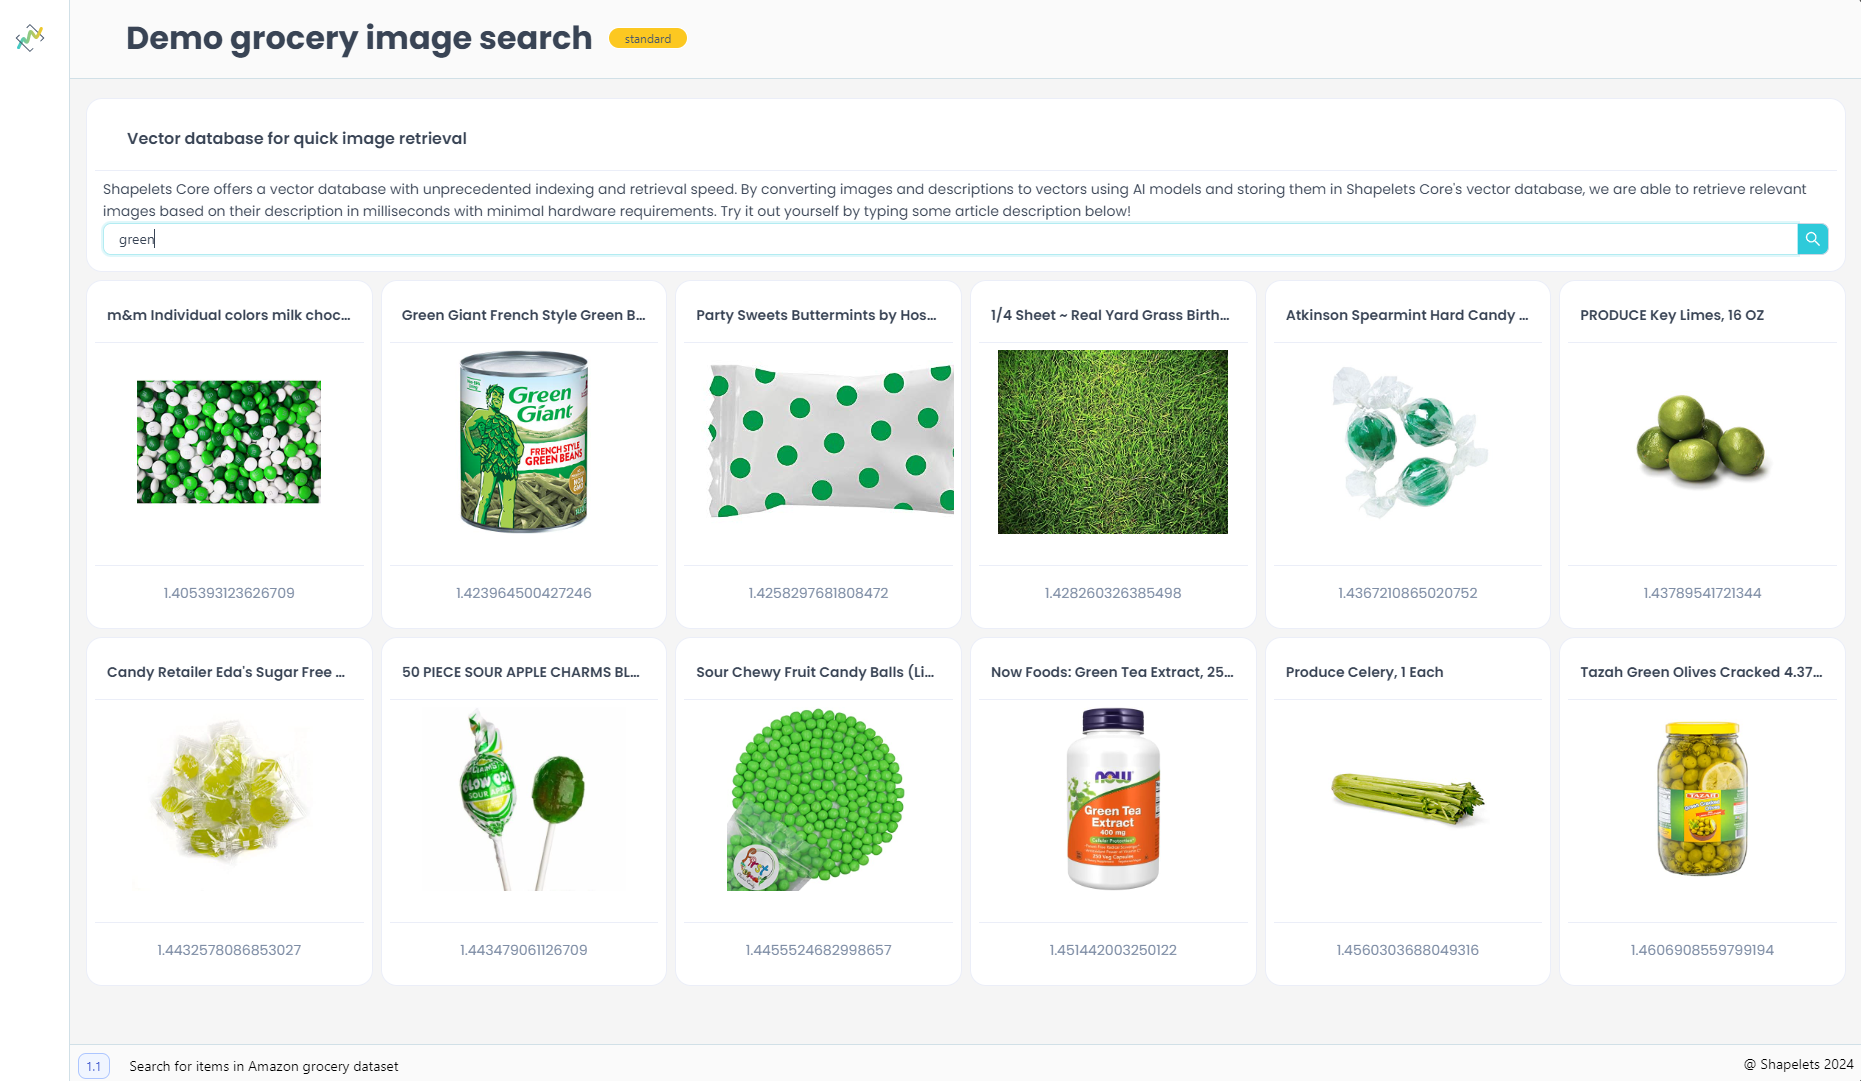
Image search engine

In this tutorial you will learn how to build an image search engine that relies on a multimodal model for embedding generation. A multimodal model is a model that can take inputs in multiple modalities (image and text in this example) and generate embeddings that are comparable. For example, vectors independently generated from the image of a cat and from the text "cat" will be very similar. Let's follow the next steps to build our image search engine:
- Take a dataset of images of grocery products and convert them into vector embeddings. We have already done this for you.
- Store the embeddings in a vector database following a certain order, so that given an id based on their position, we can retrieve the product information (i.e. description and image)
- Create a web application using Shapelets Data Apps that will:
- Obtain a text query from the user.
- Convert it into a vector.
- Query the vector database with this vector and retrieve the nearest neighbors. In this example we use to retrieve the 20 most similar products, but you can easily modify this value.
- Given the similar products found, display their images and a label that contains the product description and the distance between the query and the product's embedding.
An interesting variation of this that can be easily built would be an application that takes an image as input and finds products with similar appeareances. Feel free to build similar systems, experiment with this code and modify this to fit your needs.
The code
First, let's do some imports. We will be using towhee to create the embedding generation pipelines.
from shapelets.apps import dataApp
from towhee import ops, pipe
import numpy as np
from pathlib import Path
import shutil
from shapelets.storage import Shelf, Transformer
from shapelets.indices import EmbeddingIndex
Let's define a function that will be called every time there is a change in the query input (i.e. a new potential query).
We will first obtain the vector corresponding to our query and then use it to query the index and obtain the search results.
These results include the id of the product in the vector database r.oid, and its distance to the query r.distance.
We will put all the labels to be displayed and the image urls in both lists.
Finally, the function will fill the pre-generated image boxes with the image urls that are relevant to the query.
def textChanged(text: str) -> None:
    query = text_encoder(text).get_dict()['vec']
    result = index.search(query, num_images)

    images = []
    labels = []
    for r in result:
        if data[r.oid][0] and data[r.oid][1]:
            labels.append(data[r.oid][0] + ' ' + str(r.distance))
            images.append(data[r.oid][1])
    for i in range(num_images):
        try:
            list_images[i].src = images[i]
        except:
            list_images[i].src = "https://upload.wikimedia.org/wikipedia/commons/2/2b/No-Photo-Available-240x300.jpg"
        list_images[i].width = 150
        list_images[i].height = 150
        yield list_images[i]
Now we load the files containing the data (product descriptions and image urls) and pre-computed embeddings obtained from the images. The content in both files is aligned, so that a product in data.npy has its matching vector in the same position in vector.npy. These files are available here:
data = np.load('data.npy', allow_pickle=True)
vectors = np.load('vectors.npy', allow_pickle=True)
Now we will create the structure needed to store the data and the indices in disk.
The data will be stored in blocks in shelfPath and the indices will be stored in indexPath.
basePath = Path('./')
shelfPath = basePath / 'shelf'
indexPath = basePath / 'index'

if shelfPath.exists():
    shutil.rmtree(shelfPath)

if indexPath.exists():
    shutil.rmtree(indexPath)

shelfPath.mkdir(parents=True, exist_ok=True)
indexPath.mkdir(parents=True, exist_ok=True)

archive = Shelf.local([Transformer.compressor()], shelfPath)
index = EmbeddingIndex.create(dimensions=vectors.shape[1], shelf=archive, base_directory=indexPath)
In this step we build the index, add documents (vectors) to it, assigning them a document ID and once they have all
been added, we add them to the vector database by calling the upsert() function.
builder = index.create_builder()

docId = 0
for vector in vectors:
    builder.add(vector, docId)
    docId += 1

builder.upsert()
Here is the towhee pipeline we will create to convert text to vectors. It takes the text and uses a masked self-attention Transformer to convert it into a vector. The vector is also normalized to ensure all vectors have unit norm and can be properly compared.
text_encoder = (
        pipe.input('text')
        .map('text', 'vec', ops.image_text_embedding.clip(model_name='clip_vit_base_patch16', modality='text'))
        .map('vec', 'vec', lambda x: x / np.linalg.norm(x))
        .output('text', 'vec')
    )
Here comes the part of the code that builds the web application. We instantiate the dataApp() object, add some text to it
and an input text area, in which users will write their queries. Every time the input text area detects some change (i.e. new characters typed) it will call the textChanged() function we defined earlier.
app = dataApp()
txt = app.title('Image search engine')
text = app.input_text_area(title="Text title", on_change=textChanged)
Now we set the number of images to be displayed and create a list that contains the empty image objects. These objects will be filled
with the image corresponding to the matched products in the textChanged() function.
num_images = 20
list_images = []
for i in range(num_images):
    list_images.append(app.image(preview=False))
Finally, we use a grid layout to place the images nicely on the app.
grid = app.grid_layout()
for i in range(0, num_images, 5):
    grid.place([list_images[i], list_images[i+1], list_images[i+2], list_images[i+3], list_images[i+4]])