Widgets#
To create data apps, Shapelets provides a wide variety of visual components that you can compose and embed in data apps to create powerful interactive visualizations. Let’s take a look.
In order to make the component visible, remember to call the app.place() method passing the component you want to embed in the data app.
Text#
Shapelets provides a component called text() which lets us render text in data apps. In order to create one, we only need to pass a string.
>>> simple_text = app.text("Hello world!")
This component renders the contents of the string passed into the data app’s layout.
This component admits Markdown Syntax, so we can write huge texts and render them. Just make sure you pass markdown = True.
>>> markdown_text = app.text("""
>>>     # Heading 1
>>>     In this data app we are trying the Markdown Syntax
>>>
>>>     We have all the **resources** available in *markdown*, for example
>>>
>>>     - List
>>>     - Tables
>>>     - Links
>>>     - `inline code`
>>>     - code blocks
>>>     - and more!
>>> """, markdown = True)
>>> app.place(markdown_text)
You can explore the component on the API Reference in text().
Charts#
Data apps have been conceived for visualization, so you can use a lot of interactive chart components, like the line_chart(). Let’s create one:
>>> data = [1,2,3,4,5,6]
>>> line_chart_graph = app.line_chart(title='Linechart', value=data)
>>> app.place(line_chart_graph)

You can explore the component on the API Reference in line_chart().
Action components#
Slider#
You can create a slider() and configure it to have a default value, and custom min/max/step values.
>>> my_slider = app.slider(title='Change numbers', value=10, min_value=1, max_value=20, step=1)
>>> app.place(my_slider)
You can explore the component on the API Reference in slider().
Selector#
You can use select component in Shapelets using selector().
>>> my_selector = app.selector(options=['red', 'blue', 'yellow', 'green', 'orange'], title="My color selector")
>>> app.place(my_selector)
You can explore the component on the API Reference in selector().
Server-side functions#
You can write your own python functions to create interactions within the data app. For example, functions to change the content of a chart, to train machine learning models or to download data. Everything you can do in Python, you can do it with Shapelets, there are no restrictions.
Here is an example:
>>> def squared_data(list data) -> LineChart:
>>>     squared_data = data ** 2
>>>     return LineChart(squared_data)
Do you want to learn how to connect functions to components? Check out the next section.
Binding actions to components#
You have several options to run functions using visual components:
Call the function when a button is pressed.
Call the function when a slider is moved.
Call the function when the value of a variable changes.
Shapelets incorporates a novel way of connecting the different action components (button, slider, selectors…) to user-defined functions. In this section we will see how to do a binding.
The formula is simple, pass the function to the object you want to modify through the bind() function. The function should return an object of the same class as the object being modified or a type that can be deduced from the type of component. The component(s) triggering the execution of the function must be passed in a list to the triggers parameter. Additionally, changes in controllers or function parameteres passed to mute will not cause the execution of the function.
>>> visual_component.bind(function, params, mute=[ignored_component(s)], triggers=[triggering_component(s)])
Let’s look at some full examples.
Layouts#
When developing a Data App we can configure the layout of the page to make it more visual and personalised. To do this, the Shapelets Data Apps API includes some functions so that you can modify the layout according to your needs.
Vertical Layout#
First we will talk about the default layout we use when developing a DataApp, the vertical_layout(). In this layout, every time we create a widget and place it
in the layout with place() function, it will be created vertically and consecutively.
For example, if we create a dataapp with a slider and a button, and place it into the Data App, this would be the result.
>>> vlayout = app.vertical_layout()
>>>
>>> my_button = app.button("Try me")
>>> vlayout.place(my_button)
>>>
>>> my_slider = app.slider(title='Change numbers', value=10, min_value=1, max_value=20, step=1)
>>> vlayout.place(my_slider)
>>>
>>> app.place(vlayout)
>>> from shapelets.apps import DataApp
>>>
>>> app = DataApp(name="Data App Title")
>>>
>>> vlayout = app.vertical_layout()
>>>
>>> my_button = app.button("Try me")
>>> vlayout.place(my_button)
>>>
>>> my_slider = app.slider(title='Change numbers', value=10, min_value=1, max_value=20, step=1)
>>> vlayout.place(my_slider)
>>>
>>> app.place(vlayout)
>>>
>>> app.register()
And you will have a DataApp like this:
Note
This layout is the default layout in a Data App, so if you don’t need to modify the layout you don’t need to call the vertical_layout widget. If you create a widget and place it in the dataapp, it will automatically be inserted in the default vertical layout.
Horizontal Layout#
In case we want to stack the elements horizontally, we can use the horizontal_layout() widget, which has the same behaviour as the vertical layout, but it will stack the elements horizontally.
Let’s look at the same example as in the previous section, now using a horizontal layout.
>>> hlayout = app.horizontal_layout()
>>>
>>> my_button = app.button("Try me")
>>> hlayout.place(my_button)
>>>
>>> my_slider = app.slider(title='Change numbers', value=10, min_value=1, max_value=20, step=1)
>>> hlayout.place(my_slider)
>>>
>>> app.place(hlayout)
>>> from shapelets.apps import DataApp
>>>
>>> app = DataApp(name="Data App Title")
>>>
>>> hlayout = app.horizontal_layout()
>>>
>>> my_button = app.button("Try me")
>>> hlayout.place(my_button)
>>>
>>> my_slider = app.slider(title='Change numbers', value=10, min_value=1, max_value=20, step=1)
>>> hlayout.place(my_slider)
>>>
>>> app.place(hlayout)
>>>
>>> app.register()
And you will have a DataApp like this:

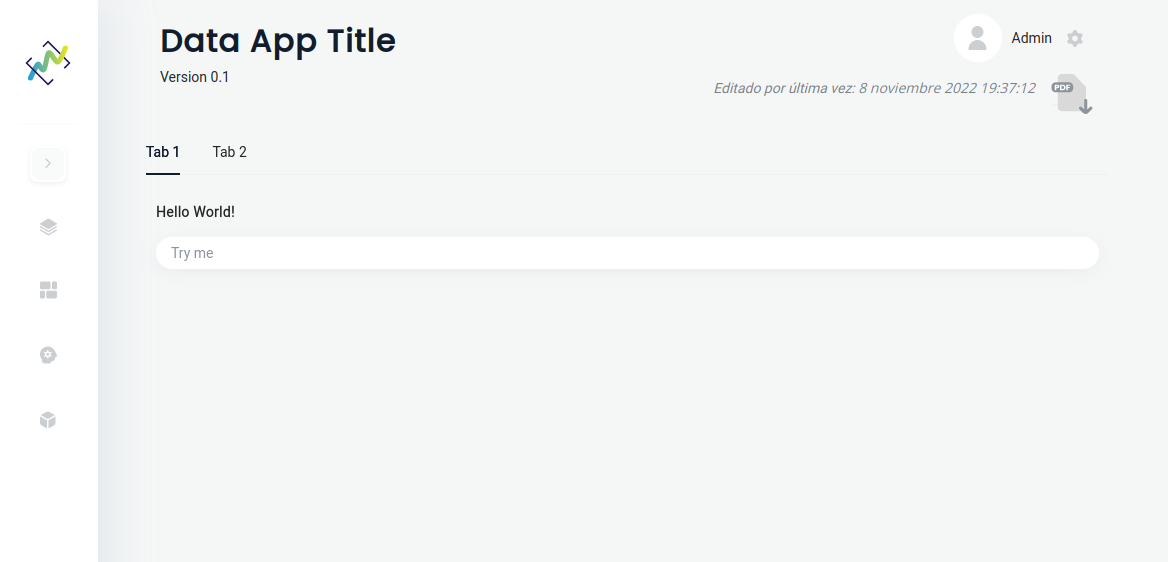
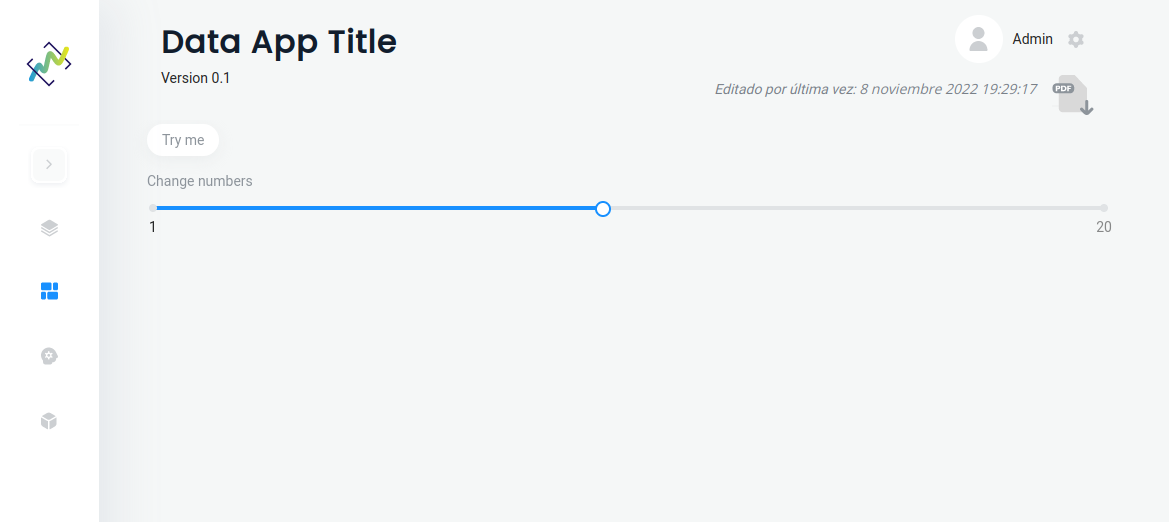
Tabs Layout#
In Shapelets you can use tabs to create more advanced and tidy interfaces. And it’s easy too, simply use the tabs_layout() widget
>>> tabs = app.tabs_layout()
>>>
>>> layout1 = app.vertical_layout()
>>> layout2 = app.horizontal_layout()
>>>
>>> text1 = app.text("Hello World!")
>>> button1 = app.button("Try me")
>>> slider1 = app.slider(title='Change numbers', value=10, min_value=1, max_value=20, step=1)
>>>
>>> layout1.place(text1)
>>> layout1.place(button1)
>>>
>>> layout2.place(text1)
>>> layout2.place(slider1)
>>>
>>> tabs.add_tab("Tab 1", layout1)
>>> tabs.add_tab("Tab 2",layout2)
>>>
>>> app.place(tabs)
>>> from shapelets.apps import DataApp
>>>
>>> app = DataApp(name="Data App Title")
>>>
>>> tabs = app.tabs_layout()
>>>
>>> layout1 = app.vertical_layout()
>>> layout2 = app.horizontal_layout()
>>>
>>> text1 = app.text("Hello World!")
>>> button1 = app.button("Try me")
>>> slider1 = app.slider(title='Change numbers', value=10, min_value=1, max_value=20, step=1)
>>>
>>> layout1.place(text1)
>>> layout1.place(button1)
>>>
>>> layout2.place(text1)
>>> layout2.place(slider1)
>>>
>>> tabs.add_tab("Tab 1", layout1)
>>> tabs.add_tab("Tab 2",layout2)
>>>
>>> app.place(tabs)
>>>
>>> app.register()